
Bathroom Update Week 3: One Room Challenge
- LaCinda Glover

- Oct 17, 2021
- 3 min read
Week 3 of the #oneroomchallenge was all about firsts! I worked alongside my dad to re-wire two vanity lights and learned how to make a tufted cushion for a little bench that will be sitting in the corner of the bathroom. My mom still doesn't have a clue what the bathroom is going to look like, and her friends think she's crazy for giving us free reign. I think she trusts that she raised amazing daughters who know what she likes ;) We also got some great news this week that mom's cancer is shrinking. Praise God! I'm continuing to pray she gets to enjoy this bathroom for many years.
So here is a recap of week 3, and a tutorial on how to tuft a cushion, because I know you all want to do that. Ha!
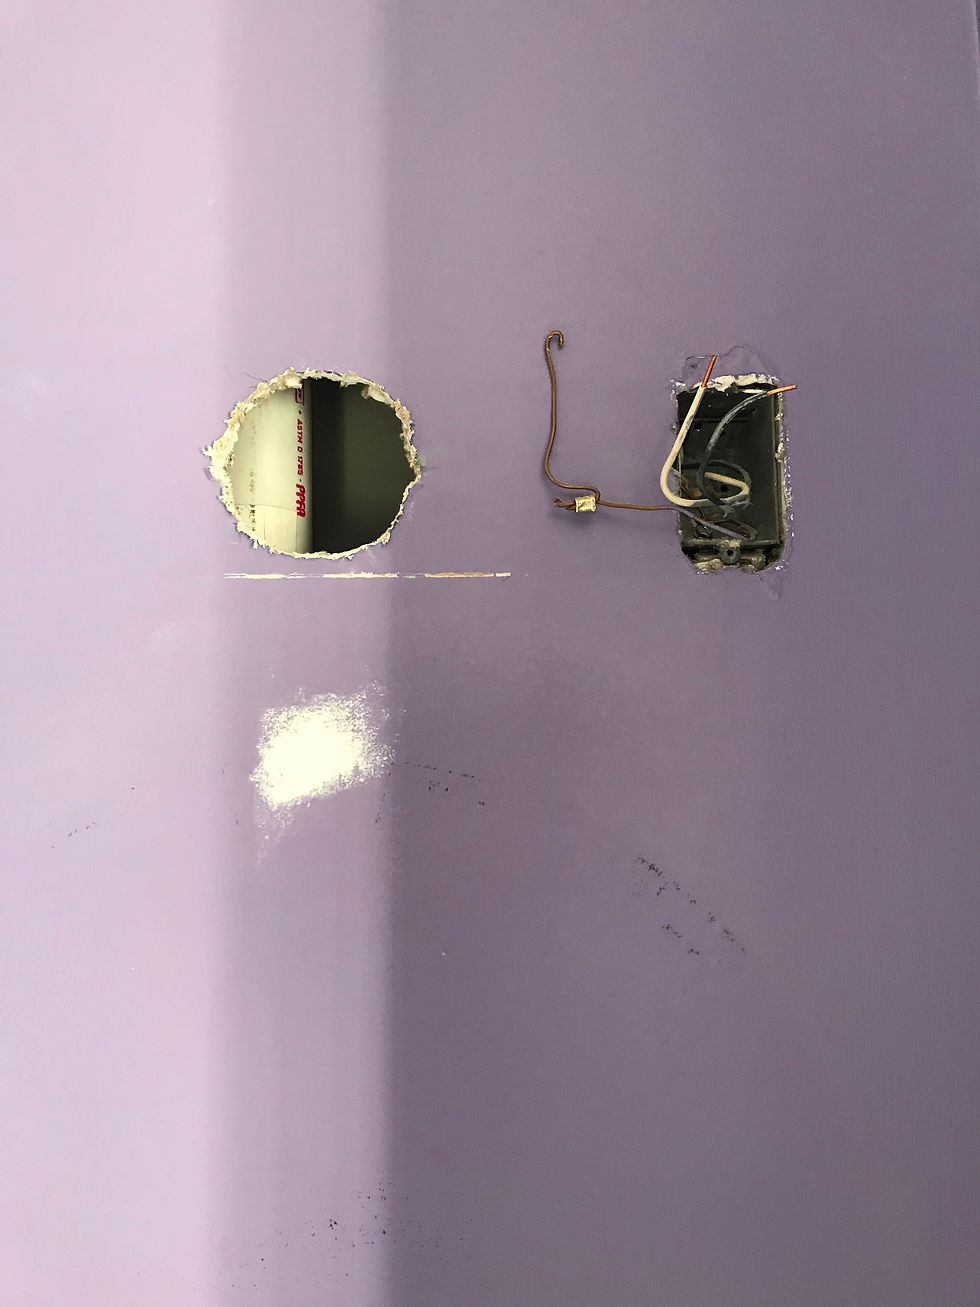
First project: move and re-wire two fixtures so they are centered over the vanity sinks. The old light boxes where hidden behind a long bar and the electric box was off center. The new lights have a smaller box in the middle so we had to move the wiring and install a new box. Long story short, none of the electric was where we thought it was, and a water pipe gave us a little scare. That said, one awesome thing about being a girl is that my arms were way smaller than my dad's and I could reach pretty far into the wall.
Below is a picture of the off-center boxes,

In the picture below you can see the pipe that we thought for sure was going to be in the way of the new box, but it was about 1/2 inch further back than we needed. Big win!
And lastly, the old hole is patched and the new box is in and wired.

Second project: upholstery the cushion for this little bench and add tufting, remove the silver handles, patch holes, and give it a fresh coat of paint.
Before picture of the bench:

Step 1 of upholstering: cut your foam pad and back board to size. I didn't want to use plywood because it would make the cushion too tall, so I used a flat canvas from the craft store and cut it with a utility knife.

Step 2: Mark your tufting holes on the foam and back board (thick canvas in my case). Poke holes in the foam with a screwdriver where you marked your spots, and use a drill to make holes in the back board. You want your holes big enough so it's not hard to find when you start threading your needle and button.

Step 3: cut your material to fit. Make sure you have enough to go around all the sides. If you are using wood as the backer board you'll need to cover with batting first so you don't have any gaps.

Step 4: staple the material to the back board...make sure it's nice and snug and fold your corners so they are clean (like you're wrapping a present!). I stuck this pencil in here to make sure my foam pad and back board stayed lined up while I stapled the fabric.

Step 5: use a needle and thick thread to sew in your button. I didn't have thick thread so I just used 4 strands of regular thread so it was thicker and stronger. You start on the back side and poke the needle through the front side, thread through the button, and then take the needle back through from the front to the back. Watch your fingers, I definitely poked myself a few times!

Step 6: Pull hard so it pulls the button down and makes the "tuft". Staple the thread on the back board in a few places, making sure you secure it well. Then tie a few knots so it doesn't slip. You can see the hole I came up through on the white back board, and then the two staples I used to secure the string.

And at last, you have a tufted cushion! I'm so happy with how it turned out. Such an easy update! Also, sneak peak of the wall color below...will it be gray, white, or pink? You'll have to stick around to find out.

Don't forget to follow along with the rest of the ORC participants at www.oneroomchallenge.com/orc-blog!


Comments